It is currently Tue Apr 16, 2024 7:26 am

All times are UTC


THE PROP DEN is primarily a Darth Vader Prop Discussion Board, but we also deal with other Star Wars Props as well as Prop Replicas from other movies. If you do not yet have an account, set one up, sign in and jump into the Vader Prop Discussions!


Post new topic Reply to topic  [ 69 posts ]  Go to page Previous  1, 2, 3, 4, 5  Next
Author Enter your Message here
 Post subject: Re: Making a brighter Rubie
PostPosted: Mon Apr 18, 2011 9:29 am 
Offline
Site Admin
User avatar

Joined: Thu Aug 31, 2006 8:58 am
Posts: 10910
Location: Denmark
NikonD80 wrote:
Image

Image

What I meant previously is that the rear end of the upper tubes are are the correct level, but on their way forward, they sink in way too much, so you shouldn't cover the whole tube and you have to keep some "sunken in" effect. It is very minimal what you need to do, which is basically just building up the area slightly with very little material. You've added way too much.

_________________
Check us out at Facebook!
http://www.facebook.com/ThePropDen


Top
 Profile  
 
 Post subject: Re: Making a brighter Rubie
PostPosted: Tue Apr 19, 2011 8:39 am 
Offline
User avatar

Joined: Fri Dec 17, 2010 3:10 pm
Posts: 98
Location: A mysterious garage somewhere in Uxbridge
I see what you mean. It explains why I was having so much trouble trying to follow what you'd said earlier.
I've pulled all the clay back off and started again. This time it's lloking much closer to the photo references I have.
Thanks for putting me back on track.


Top
 Profile E-mail  
 
 Post subject: Re: Making a brighter Rubie
PostPosted: Tue Apr 19, 2011 9:06 am 
Offline
Site Admin
User avatar

Joined: Thu Aug 31, 2006 8:58 am
Posts: 10910
Location: Denmark
Yes, basically from the corners of the eyes and forward is what needs to be bulged out and then carefully blended with the rest.

_________________
Check us out at Facebook!
http://www.facebook.com/ThePropDen


Top
 Profile  
 
 Post subject: Re: Making a brighter Rubie
PostPosted: Tue Apr 19, 2011 7:11 pm 
Offline
Random avatar

Joined: Fri Sep 11, 2009 5:52 pm
Posts: 175
If i may?
I think if you got rid of that inner nose piece, it would help a lot. It makes the nose indent too narrow and throws off a lot of the other measurements.

Rich


Top
 Profile E-mail  
 
 Post subject: Re: Making a brighter Rubie
PostPosted: Wed Apr 20, 2011 1:29 am 
Offline
User avatar

Joined: Thu Dec 21, 2006 10:46 pm
Posts: 5241
Location: San Jose, CA
The effort is admirable, but here is the problem with trying to correct the head shape. The moment you flex the plastic material, it can break from the epoxy clay (or whatever it is that you're using).

You have the right idea, but it's too much effort to go into something that, by virtue of its plastic, is not the best recipient of that effort.

I ran into the same problem with trying to make my Rubie's more accurate by cutting down the tubes length so that they no longer reach the rear rim. The problem with the plastic is that things may stick with it but won't flex with it, unless you use similar material and can weld it to the plastic.

One idea is that if you had leftover plastic elsewhere that you cut it into chips and melt it in acetone and then apply it to the plastic. In theory, it would weld. In theory, you could cast it - even ABS. However, sanding plastic of this nature is a painful process. It's not like the resin used in conjunction with fiberglass.

_________________
Cordially,

- Mac
( Follow me on Facebook: https://www.facebook.com/sculptingvader/ )


Top
 Profile  
 
 Post subject: Re: Making a brighter Rubie
PostPosted: Wed Apr 20, 2011 3:06 pm 
Offline
User avatar

Joined: Fri Dec 17, 2010 3:10 pm
Posts: 98
Location: A mysterious garage somewhere in Uxbridge
Rich, have you been reading my mind? :eek I have been toying with doing exactly what you suggest. I've removed the rear melted plastic that holds it in place so I'll pop out the part and see how things look.

Mac, coming from you 'admirable' is high praise indeed.
If your thread about your Rubies were a book, my copy would be very dog-eared and creased by now. :lol

I have encountered the whole plastic flexing problem. Both P-38 car body filler and Milliput have flaked off the way you describe. The other problem I had with the Milliput is that if I mucked something up (like I did with the cheeks) I've wasted the stuff and can only bin it (at least it peels off easily). That's why I decided to use the pack of Klean Klay I purchased. This stuff flexes with the plastic and it adheres wonderfully too. Also, when I had to redo the cheeks, I just scrapped it off and reused it.

I understand what you mean about the amount of effort it takes to get a reasonable result but using the clay I have is helping me to learn a lot for the real deal when I do it. I've never sculpted before in my life so the learning curve is sometimes pretty steep. My plan is to use this project to build the skills I need to do a proper sculpt from scratch. I'm basing my plan on the info found at the following link.

http://www.propbuilder.co.uk/howto/siliconethixo.html

I.E. use the existing mask as a base for the clay then cast the result in GRP. So far, I have only cast simple shapes and never needed to use silicon. This project will be a nice way to try things out.


Top
 Profile E-mail  
 
 Post subject: Re: Making a brighter Rubie
PostPosted: Tue Apr 26, 2011 5:23 pm 
Offline
User avatar

Joined: Thu Dec 21, 2006 10:46 pm
Posts: 5241
Location: San Jose, CA
Nikon,

I like what you did with the forward-facing portions of the mod so far. I think that if you had a way to undo the excessive widening of the sides of the face (to where, now, the silhouette is wider than the Rubie's original condition) then you'd be on your way. :thumbsup

Everyone, the Rubie's is what it is: a malformed piece of plastic. I think people get too concerned with the "accuracy" of small features that they miss the big picture. In accurizing features, they lose the overall look, and now it looks like a modified Rubie's.

Some mods are not worth doing because they either compromise the structure of the mask (each time you cut something and reposition it but fail to weld it fully) or if you add on stuff that won't flex with the plastic.

My suggestion is to take the best artistic approach you can. Some flaws are not worth correcting because, under shadow or under the helmet, nobody ever notices it. I'm actually quite shocked how some people can do a bare minimum, shoot it with good paint, and from a distance the gloss is more than forgiving and can fool you for a second or two.

These are the lessons I had learned when trying to do an all-out accurization, and the return was disproportionate to the time, cost and effort invested into it.

I'd basically say: mod the eyes, nose bridge, nose, teeth holes - and then a really good paint job will help you call it a day. If you try adding material to beef up the sides of the face, do so sparsely. That means you have to bulk up the tubes a bit to ensure they flow properly. But again, under shadow, most people don't notice because the gloss is what they visually pic up from 8+ feet away. :thumbsup

_________________
Cordially,

- Mac
( Follow me on Facebook: https://www.facebook.com/sculptingvader/ )


Top
 Profile  
 
 Post subject: Re: Making a brighter Rubie
PostPosted: Wed Apr 27, 2011 7:13 pm 
Offline
User avatar

Joined: Fri Dec 17, 2010 3:10 pm
Posts: 98
Location: A mysterious garage somewhere in Uxbridge
Mac,
It’s so nice to read what you wrote there. It gave me a real shot of encouragement when I needed it most.

I've spent the last few days scrapping off all the clay that I'd applied to the cheeks and redoing that area. I've reused the ali tubing from before but I cut the pipe in half all the way down the tube and then slightly bent each piece it to get that flowing look.

The inside piece of the nose has gone and been replaced with clay, I've also slightly modified the whisker on the right (as you look at the mask). I'm now pretty happy with the result. To my eyes, it has stopped that side of the face looking all slumped. The challenge has been to try to keep the asymmetry (it’s amazing how you subconsciously try to make the left and right sides matchup).

I’ve now started to plug all the gaps in the mask prior to casting it. The inside of the mouth has had some plastic backed hardboard added and the tusk holes have been filled in. All the clay was smoothed by brushing a thin layer of Vaseline over it and then working it with the brush. Once I was happy that it was as good as I was going to get it, I set the clay by applying baby talc over the top. The clay is now feeling like freshly set plaster.

I’ve next got to fill in some of that area in the triangle under the chin – just enough to stop any undercut in the mould. Then I can either make some clay ‘lenses’ or use some old sunglasses (or similar) to plug the eye holes. I applied some shore25 RTV to the mask as a test and things look very promising. I just need to get some thickener and some more clay for the edges before operation ‘cast a mask’ starts.

I’ve also made a start on the helmet too. I used some 1” wide masking tape to mark the two sides of the ridge – I just applied the tape over the area I wanted to keep. I next used a Dremel to cut the sides down and then pared away the waste with a sharp chisel. The ridge was sharpened by filing away at the line I wanted and then adding some Milliput to soften the edge again. I also chiselled away the brow are of the helmet. I did this by eye using ESB screen grabs as a reference.

Here’s some photos of the state of play so far.

Image

Image

Image

Image

Image


Top
 Profile E-mail  
 
 Post subject: Re: Making a brighter Rubie
PostPosted: Wed Apr 27, 2011 7:19 pm 
Offline
User avatar

Joined: Sat Jan 06, 2007 6:05 pm
Posts: 1312
Location: Pennsylvania
Nice work so far. I've had two of these and never could work up the ambition to tackle one. Some dome repositioning will be a big improvement on this as well. :thumbsup

_________________
" Life is tough....it's tougher if your stupid. "


Top
 Profile  
 
 Post subject: Re: Making a brighter Rubie
PostPosted: Wed Apr 27, 2011 8:06 pm 
Offline
User avatar

Joined: Thu Dec 21, 2006 10:46 pm
Posts: 5241
Location: San Jose, CA
Glad I could be of encouragement!

So here are a few other pointers

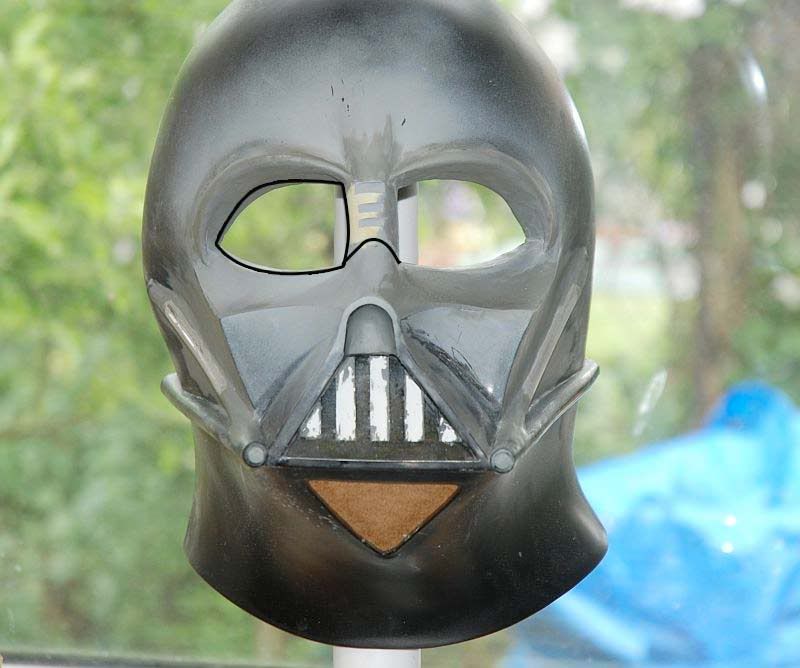
1. The plastic metallic inner-nose piece should be removed, yes, but not resculpted, otherwise the inside nose area is too narrow. The nose should actually be wider. However, that involves building out the exterior in a way that flows with the bridge of the nose, and the cheek surfaces that join the nose. That may be far too complex an operation, so at a bare minimum remove the clay that you used to replace the plastic piece.

2. It looks like you added material to bulk up the eyebrows, but watch for the forehead-to-brow transition, as that will require some sanding. I usually wrap sandpaper around cardboard or firm foam and go in circles. Stay at about 120-160 grit so you are not gouging the plastic.

3. The inner upper eyelids are a problem but fixable. Notice the negative space they create (eye holes) and thus the eye holes look too triangular. They need to be shaped a little like lemons. Here is a reference for you. It's not only depth but angle, and this where a lot of fan-modification websites back in my day had it wrong.

Image

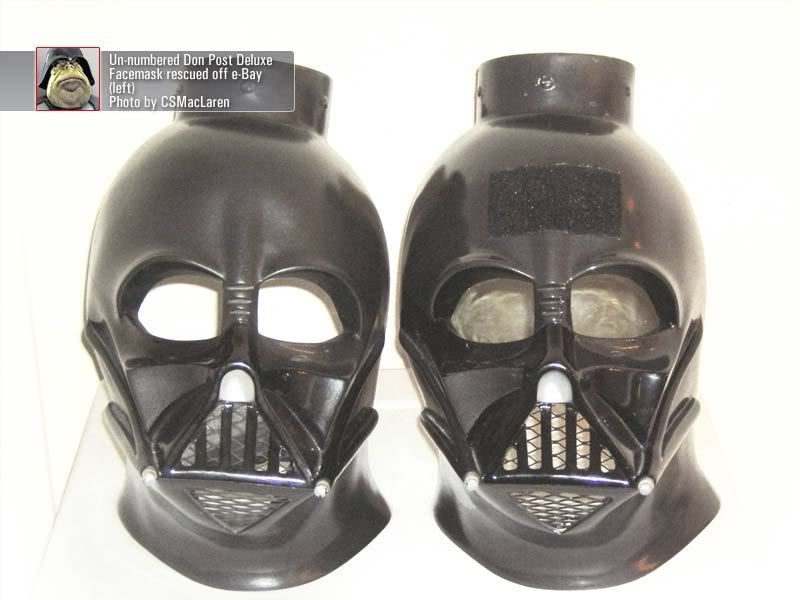
Here's another pic courtesy of Anson James.

Image

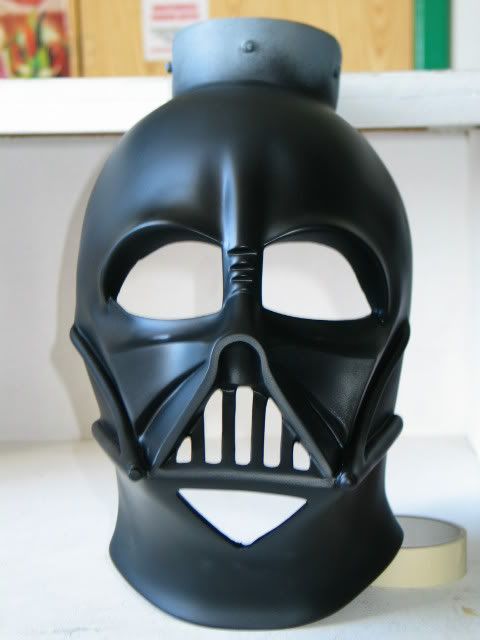
4. Contrary to popular belief, the helmet's fold line does not have to be super sharp. The reason why we feel the detail is sharp is because you have two surfaces at different angles reflecting light, and the point of intersection gives enough contrast. So this is not where you dig a sculpting tool into the clay. Rather, it's a change in surface vector/direction.

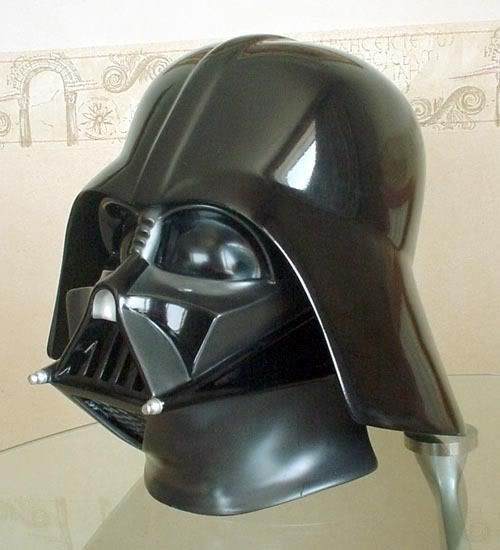
5. The nose bridge - Is there any way to sand that down? It looks swollen. From the front, it looks great though. When he's looking off at 45 degrees, it should look like this:

Image courtesy of Darth Manuno.

Image

Keep it up! It's looking better by leaps and bounds! :thumbsup

_________________
Cordially,

- Mac
( Follow me on Facebook: https://www.facebook.com/sculptingvader/ )


Top
 Profile  
 
 Post subject: Re: Making a brighter Rubie
PostPosted: Wed Apr 27, 2011 8:08 pm 
Offline
User avatar

Joined: Thu Dec 21, 2006 10:46 pm
Posts: 5241
Location: San Jose, CA
By the way, when you're reading to tackle the dome mounting system on the mask, I suggest you do not cut it like some tutorials do - unless you have a way of welding the plastic after re-angling it. There are other approaches to this.

_________________
Cordially,

- Mac
( Follow me on Facebook: https://www.facebook.com/sculptingvader/ )


Top
 Profile  
 
 Post subject: Re: Making a brighter Rubie
PostPosted: Thu Apr 28, 2011 1:43 pm 
Offline
Site Admin
User avatar

Joined: Thu Aug 31, 2006 8:58 am
Posts: 10910
Location: Denmark
Looking much better with the rework of the sides of the face and the tubes. :thumbsup

_________________
Check us out at Facebook!
http://www.facebook.com/ThePropDen


Top
 Profile  
 
 Post subject: Re: Making a brighter Rubie
PostPosted: Fri Apr 29, 2011 1:58 pm 
Offline
User avatar

Joined: Fri Dec 17, 2010 3:10 pm
Posts: 98
Location: A mysterious garage somewhere in Uxbridge
Hi guys, thanks for those pointers. It's funny how you can't see these things yourself until someone else points them out to you, then it's almost embarrassingly obvious and you deserve a big slap to the forehead.

I've done some more work on the nose: the bulk of the clay has been removed from the inside and all that's left is what is needed to fill in the hole left by the plastic piece I removed. I've also sanded that bulge down some more. It's now flat all the way 'round when I hold a straight edge up to it so hopefully it's OK now. What do you think?

Mac, I looked at correcting the eyes but wanted to clarify what you meant before I charge in and change things. I'm taking what you wrote to mean that the outer parts are Ok but the shape of the hole left at the extreme inside is wrong (i.e. that's the bit that needs to be more lemon shaped). Is that right?

Work has now stopped for the rest of today - a bit too much celebratory Royal wedding champagne has been consumed to enable me to continue. :lol

Image

Image


Top
 Profile E-mail  
 
 Post subject: Re: Making a brighter Rubie
PostPosted: Fri Apr 29, 2011 6:23 pm 
Offline
User avatar

Joined: Thu Dec 21, 2006 10:46 pm
Posts: 5241
Location: San Jose, CA
Nikon

Splendid progress! I don't have much time to write as I'm busy today at work, but here is a quick mockup for the next stage of your mod.

Image

The inner eyelids are looking better. The left eye (left as you look at it) - the 10 o'clock area needs to be reduced in depth a touch.

Also, I think you have excess material on your lower inside eyelids / ledges to where their angle is wrong. Look back at my DP photos, and I've also documented the Don Post Deluxe somewhere in the Vader Props (Official) forum here on the Den - plenty of photo references.

_________________
Cordially,

- Mac
( Follow me on Facebook: https://www.facebook.com/sculptingvader/ )


Top
 Profile  
 
 Post subject: Re: Making a brighter Rubie
PostPosted: Fri Apr 29, 2011 7:27 pm 
Offline
Site Admin
User avatar

Joined: Thu Aug 31, 2006 8:58 am
Posts: 10910
Location: Denmark
What did you use to grind down the softness of the dome ridge edges?

_________________
Check us out at Facebook!
http://www.facebook.com/ThePropDen


Top
 Profile  
 
Display posts from previous:  Sort by  
Post new topic Reply to topic  [ 69 posts ]  Go to page Previous  1, 2, 3, 4, 5  Next

All times are UTC


Who is online

Users browsing this forum: No registered users and 0 guests


You cannot post new topics in this forum
You cannot reply to topics in this forum
You cannot edit your posts in this forum
You cannot delete your posts in this forum
You cannot post attachments in this forum

Jump to:  
cron
Blue Moon by Trent © 2007
Powered by phpBB © 2000, 2002, 2005, 2007 phpBB Group
Hosted by Freeforum.ca, get your free forum now! TOS | Support Forums | Report a violation
MultiForums powered by echoPHP phpBB MultiForums