It is currently Sat Apr 20, 2024 3:00 am

All times are UTC


THE PROP DEN is primarily a Darth Vader Prop Discussion Board, but we also deal with other Star Wars Props as well as Prop Replicas from other movies. If you do not yet have an account, set one up, sign in and jump into the Vader Prop Discussions!


Post new topic Reply to topic  [ 186 posts ]  Go to page Previous  1 ... 3, 4, 5, 6, 7, 8, 9 ... 13  Next
Author Enter your Message here
 Post subject:
PostPosted: Sat Mar 10, 2007 9:17 pm 
Offline
Site Admin
User avatar

Joined: Thu Aug 31, 2006 8:58 am
Posts: 10910
Location: Denmark
Actually... the Rubies eyebrows are exactly where they ought to be. Take a look at the comparison pic I posted of the ESB poster helmet. The eyebrows' lower edge on the right should end right at the upper corner at the nose ridge, whereas the left should be slightly above it.

_________________
Check us out at Facebook!
http://www.facebook.com/ThePropDen


Top
 Profile  
 
 Post subject:
PostPosted: Sat Mar 10, 2007 9:17 pm 
Offline
User avatar

Joined: Thu Dec 21, 2006 10:46 pm
Posts: 5241
Location: San Jose, CA
When I first started on this project, I did not have the benefit of owning a Don Post Deluxe original like I do now. I simply read up on a few online tutorials -- each with their respective strenghts and weaknesses.

Image

Now I have the benefit of being able to better approximate not only the depth but the direction of the facets of the inner eyelids.

So let's see what AquaMend can do.

More later!

_________________
Cordially,

- Mac
( Follow me on Facebook: https://www.facebook.com/sculptingvader/ )


Top
 Profile  
 
 Post subject:
PostPosted: Sat Mar 10, 2007 9:22 pm 
Offline
Site Admin
User avatar

Joined: Thu Aug 31, 2006 8:58 am
Posts: 10910
Location: Denmark
Looking good. Can't wait to see what you do to it.

Also... another torturous suggestion... do something about the tip of the nose and where the nose-plug used to be... looks way too narrow.

I know... I'm bad... I'll go over in the corner now... :eek

_________________
Check us out at Facebook!
http://www.facebook.com/ThePropDen


Top
 Profile  
 
 Post subject:
PostPosted: Sat Mar 10, 2007 9:27 pm 
Offline
User avatar

Joined: Thu Dec 21, 2006 10:46 pm
Posts: 5241
Location: San Jose, CA
I had already widened it. I suppose I can widen it a bit more. :wink:

_________________
Cordially,

- Mac
( Follow me on Facebook: https://www.facebook.com/sculptingvader/ )


Top
 Profile  
 
 Post subject:
PostPosted: Sat Mar 10, 2007 9:34 pm 
Offline
Site Admin
User avatar

Joined: Thu Aug 31, 2006 8:58 am
Posts: 10910
Location: Denmark
Look at the DLX... it curves outwards from the bridge of the nose to the nose tip and the nose plug area should be the size and shape of a normal thumb.

_________________
Check us out at Facebook!
http://www.facebook.com/ThePropDen


Top
 Profile  
 
 Post subject:
PostPosted: Sat Mar 10, 2007 10:18 pm 
Offline
User avatar

Joined: Thu Dec 21, 2006 10:46 pm
Posts: 5241
Location: San Jose, CA
So you're talking about the arch of the nose itself, not the silver "hole"?

_________________
Cordially,

- Mac
( Follow me on Facebook: https://www.facebook.com/sculptingvader/ )


Top
 Profile  
 
 Post subject:
PostPosted: Sat Mar 10, 2007 10:23 pm 
Offline
User avatar

Joined: Thu Dec 21, 2006 10:46 pm
Posts: 5241
Location: San Jose, CA
Image

Thoughts on the Eyes

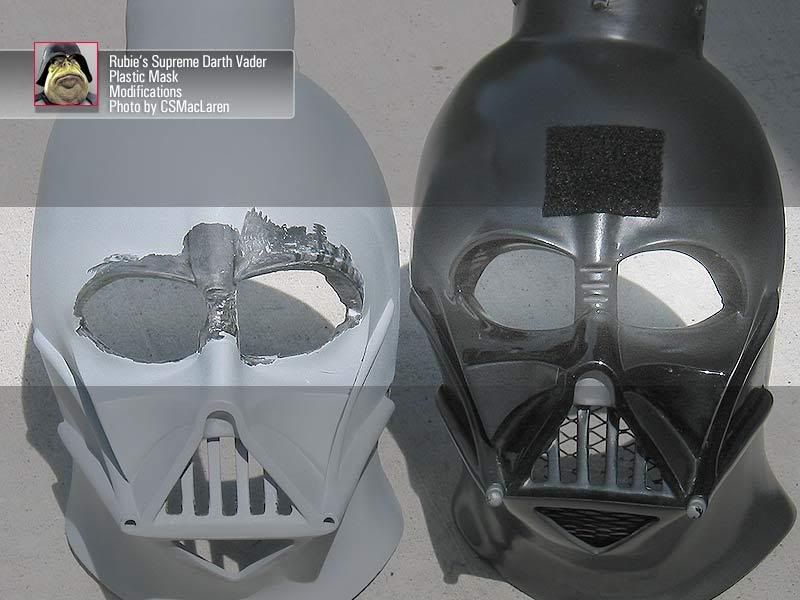
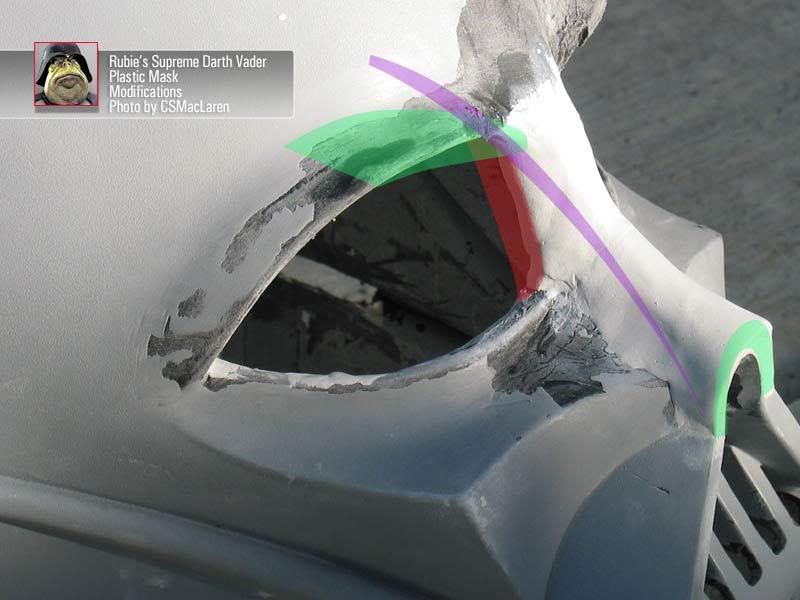
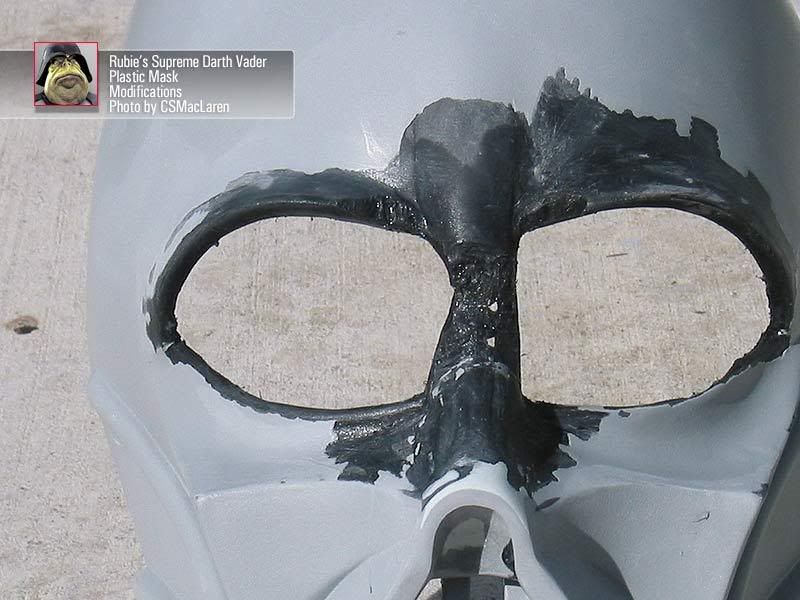
One thing I observed as a difference between the Don Post Deluxe and the Don Post Classic Action (and the Rubie's shares the same trait as the CA) is that the inner eyelids are different.

With the Don Post, the inner eyelids aren't at 90 degree angles with the outer eyelids. Rather, they go inside and widen out.

If you look spot on at the facemask, the inner eyelids disappear under the frown, so bear in mind the angle changes and is not a consistent thing; it's an organic thing.

The Classic Action, to me, loses some eye character. I believe it's because it was made to have the lenses front-mounted and therefore the angle of the inner-eyelids goes less inward. I feel you lose some of the depth and the menace this way.

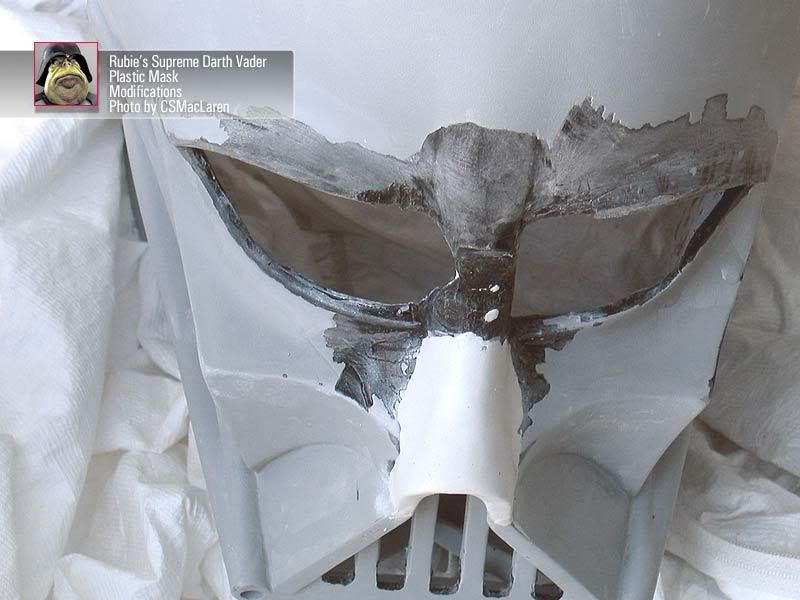
Moreso with the Rubie's. Many online tutorials tell you to merely grind away the platform of the front-mounted lenses, and then add putty. The problem is the angle of the inner eyelids. By adding putty, you are merely extending the already not-too-great angle the inner eyelids are currently at.

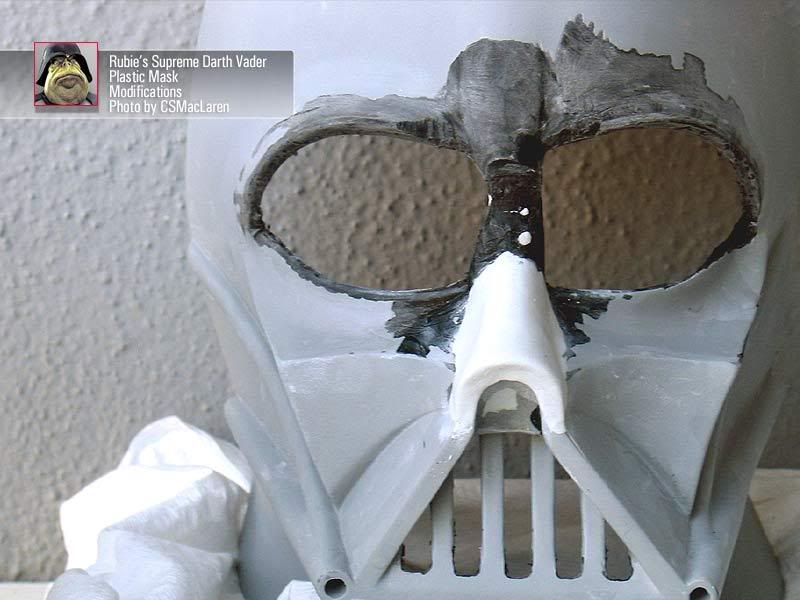
So at this particular point, after moving putty and primer, I've actually ground away the Rubie's original inner eyelids. I left probably 1/4 inch or less just to give me some foundation, but not so much as it would impede upon my work with AquaMend to establish new angles for the new inner eyelids I will shortly be forming.

Image

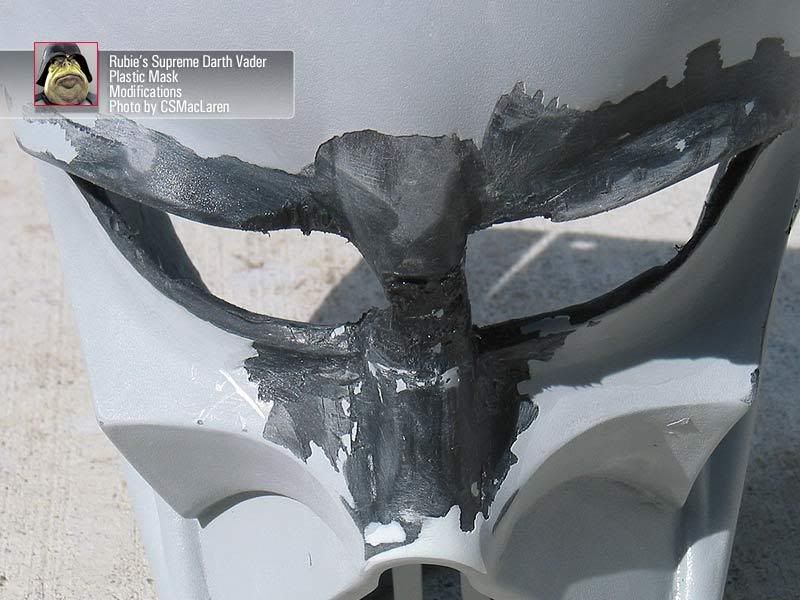
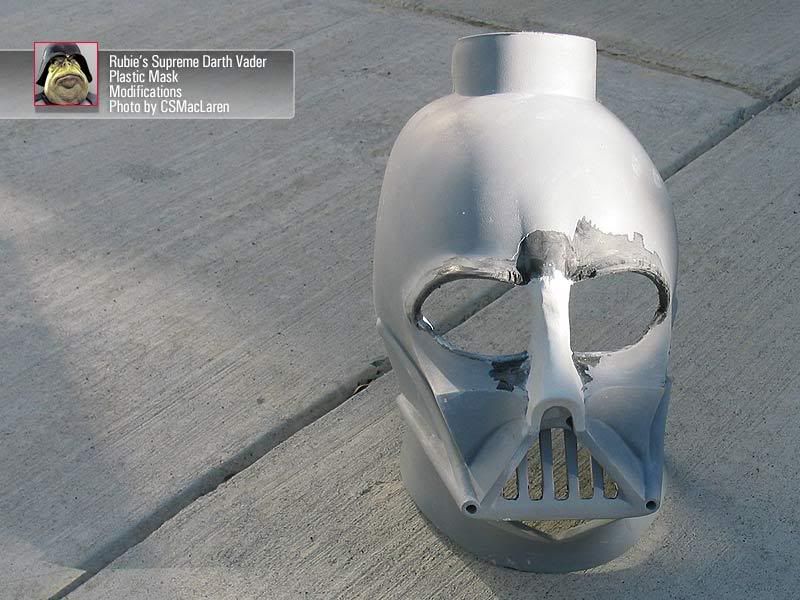
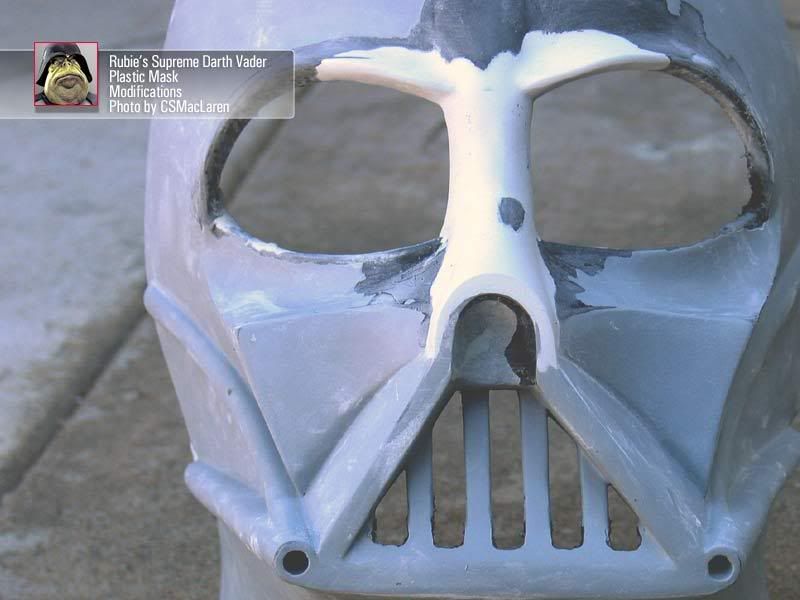
Above: Primer removal of nose area to see what NHM's fussing about. :wink:

_________________
Cordially,

- Mac
( Follow me on Facebook: https://www.facebook.com/sculptingvader/ )


Top
 Profile  
 
 Post subject:
PostPosted: Sat Mar 10, 2007 10:37 pm 
Offline
User avatar

Joined: Thu Dec 21, 2006 10:46 pm
Posts: 5241
Location: San Jose, CA
As I'm removing putty and primer, I'm amazed how many layers of primer I've put on this thing. No sense in stripping everything down. I'll just have to see how well things blend later.

_________________
Cordially,

- Mac
( Follow me on Facebook: https://www.facebook.com/sculptingvader/ )


Top
 Profile  
 
 Post subject:
PostPosted: Sun Mar 11, 2007 12:37 am 
Offline
User avatar

Joined: Thu Dec 21, 2006 10:46 pm
Posts: 5241
Location: San Jose, CA
Okay, back to the drawing board. After studying the nose a little bit more, and then studying the Don Post Deluxe, I've come to the conclusion that in order for this to look like the screen prop as much as possible (assuming, again, the Don Post Deluxe is at least 90% accurate) that you cannot just build up the bridge of the nose.

Image

There is an aesthetic flow of curves on the original (and on the Deluxe) that I missed earlier, and as I see it now, it's just looking right at me.

Vader's bridge may be parallel, but there are essentially two curves going on. The first is shown in the photo above. The area marked by the purple is like an upward, outward bump. The areas immediately to the left and right slightly curve inward.

Image

Above, the area marked green curves inward. It's a subtlety that makes Vader so wonderful as a sculpture.

Thus, it's not just a matter of making the nose wider. The width of the nose flares from bridge to tip. Further, the flare has to dip inwards on the sides.

So.....

_________________
Cordially,

- Mac
( Follow me on Facebook: https://www.facebook.com/sculptingvader/ )


Last edited by CSMacLaren on Sun Mar 11, 2007 11:23 pm, edited 1 time in total.

Top
 Profile  
 
 Post subject:
PostPosted: Sun Mar 11, 2007 12:41 am 
Offline
User avatar

Joined: Thu Dec 21, 2006 10:46 pm
Posts: 5241
Location: San Jose, CA
... so here is AquaMend. Let's see how Aquamend fares against its cousin, QuikPlastic and the PC Plumbing epoxy putty.

Image

First, it was a dream to apply. After applying it while wearing latex gloves, I could smooth over it with wet fingertips. Given my prior experience with air gaps, I made sure that I pressed and smeared the AquaMend to the receiving surface before shaping.

You will see more than enough material on the tip of the nose. I will let this cure and then sand this surface, then widen the nose hole. This is all intentional.

_________________
Cordially,

- Mac
( Follow me on Facebook: https://www.facebook.com/sculptingvader/ )


Last edited by CSMacLaren on Sun Mar 11, 2007 11:23 pm, edited 1 time in total.

Top
 Profile  
 
 Post subject:
PostPosted: Sun Mar 11, 2007 12:43 am 
Offline
User avatar

Joined: Thu Dec 21, 2006 10:46 pm
Posts: 5241
Location: San Jose, CA
Image

Visualizing those flow of lines wasn't easy, but it also occured to me that I shouldn't try to tackle too much at once. AquaMend needs nursing. Work on a small section at a time, and allow to cure. Otherwise, as it sags, your hands are going to be all over the mask trying to push the AquaMend back into shape, and you might ding up an area.

It's amazing that when you're outdoors how much crap in the air suddenly falls in love with whatever you're doing, and tries to be one with your AquaMend!

_________________
Cordially,

- Mac
( Follow me on Facebook: https://www.facebook.com/sculptingvader/ )


Last edited by CSMacLaren on Sun Mar 11, 2007 11:23 pm, edited 2 times in total.

Top
 Profile  
 
 Post subject:
PostPosted: Sun Mar 11, 2007 12:44 am 
Offline
User avatar

Joined: Thu Dec 21, 2006 10:46 pm
Posts: 5241
Location: San Jose, CA
Image

Now here I've started filling in the bridge of the nose.

Now, Vader's nose bridge is a bit like a loaf of bread that's been removed from its baking bin. Here you are seeing the "mountain" side of the bridge of the nose. I have not yet added ridges yet -- I'll get to that later. But you'll also notice that I'm not going to add the parallel sides YET and there is a reason.

_________________
Cordially,

- Mac
( Follow me on Facebook: https://www.facebook.com/sculptingvader/ )


Last edited by CSMacLaren on Sun Mar 11, 2007 11:23 pm, edited 1 time in total.

Top
 Profile  
 
 Post subject:
PostPosted: Sun Mar 11, 2007 12:47 am 
Offline
User avatar

Joined: Thu Dec 21, 2006 10:46 pm
Posts: 5241
Location: San Jose, CA
Image

Here is my plan of attack.

Once the Aquamend is fully cured, I intend to sand down the tip of the nose (indicated in green).

You have noticed that I've ground down the frown of Vader's eyebrows. These need to be brought lower to end slightly above the first cleft of the three clefts in the bridge of the nose. The Rubie's stock position is too high.

Once I've done that, then note the area in red -- those are the parallel sides of the nose.

Earlier on, I found it very difficult to get a smooth line here using sandpaper and filing. What I will do here is first establish the front curving surface, and then afterwards add the parallel sides, so that this cornering is established by shaping and not by filing later.

I wish I had known to do this at the beginning of the project, but some things cannot be visualized properly by 2D images alone. It really helps having a screen accurate prop by your side.

_________________
Cordially,

- Mac
( Follow me on Facebook: https://www.facebook.com/sculptingvader/ )


Last edited by CSMacLaren on Sun Mar 11, 2007 11:24 pm, edited 1 time in total.

Top
 Profile  
 
 Post subject:
PostPosted: Sun Mar 11, 2007 9:54 am 
Offline
User avatar

Joined: Mon Feb 19, 2007 9:36 pm
Posts: 29
Location: Kent. UK
Im finding this all very intresting Mac,

Keep the progress coming. :cool:

_________________
Ian Sutton UK Garrison

Image


Top
 Profile  
 
 Post subject:
PostPosted: Sun Mar 11, 2007 11:29 pm 
Offline
User avatar

Joined: Thu Dec 21, 2006 10:46 pm
Posts: 5241
Location: San Jose, CA
Thanks, TK7903! Kind words like that make it worth all the while!

So today, I did a lot of wetsanding with a firm sanding sponge (wrapping 3M Imperial black 220 grit sandpaper around it). I also used my thumb and just pressed the sandpaper in. Some help came from a file, the sander, a dremel with a sanding wheel.

So here is Phase 1, which is a foundation.

Image

Phase 1 is to make sure the bridge of the nose has this "flared" outward curve. Mission accomplished. Notice I'm doing these in steps. The nose here is a complex shape, but if I break it down into stages, I can build towards the complex subtleties of Vader's nose.

Things are nice and smooth. I think I understood NoHumorMan's point about the nose being too small. Here I've padded the exterior while emptying out the inside with a ball-shaped sanding Dremel bit.

_________________
Cordially,

- Mac
( Follow me on Facebook: https://www.facebook.com/sculptingvader/ )


Top
 Profile  
 
Display posts from previous:  Sort by  
Post new topic Reply to topic  [ 186 posts ]  Go to page Previous  1 ... 3, 4, 5, 6, 7, 8, 9 ... 13  Next

All times are UTC


Who is online

Users browsing this forum: No registered users and 0 guests


You cannot post new topics in this forum
You cannot reply to topics in this forum
You cannot edit your posts in this forum
You cannot delete your posts in this forum
You cannot post attachments in this forum

Jump to:  
cron
Blue Moon by Trent © 2007
Powered by phpBB © 2000, 2002, 2005, 2007 phpBB Group
Hosted by Freeforum.ca, get your free forum now! TOS | Support Forums | Report a violation
MultiForums powered by echoPHP phpBB MultiForums